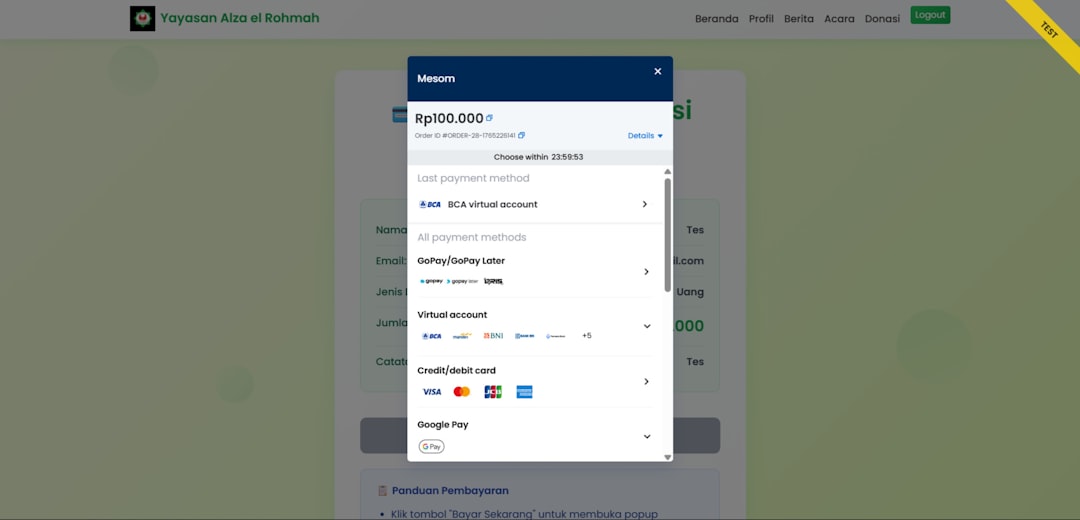
Website Design

Portfolio page design for NYC small businesses — IL WebDesign Manhattan

Portfolio Page Design: How NYC Small Businesses Showcase Their Work to Win More Clients

Portfolio page design is one of the most consequential decisions a NYC small business will make about its website. Whether you run a Tribeca photography studio, a Hell’s Kitchen interior design firm, or a Midtown consulting practice—your portfolio page is often the most important page on your website after the homepage. It’s where prospects decide whether you’re worth contacting. A weak portfolio page sends polished traffic straight to a competitor. A strong one turns curious visitors into qualified leads. In Manhattan’s crowded service market, where dozens of comparable providers are one click away, a well-designed portfolio page is the difference between being remembered and being skipped. This guide breaks down the design choices, content elements, and conversion tactics NYC small businesses can use to build a portfolio page design that consistently wins new clients in 2026. Why Portfolio Page Design Matters More Than You Think Most NYC service-business owners think of the portfolio page as a passive showcase—an online scrapbook of past work. In reality, it’s an active sales tool. According to research by the Nielsen Norman Group, web visitors typically scan rather than read, spending only a few seconds on each page before deciding whether to stay. Your portfolio page has roughly that window to communicate competence, style, and credibility. It also carries significant SEO weight. Portfolio pages naturally attract long-tail searches such as “Manhattan interior designer portfolio” or “Tribeca brand photography examples.” Google’s SEO Starter Guide emphasizes that pages with original, useful content—exactly what a strong portfolio offers—rank better than thin or generic pages. The Trust Equation Prospective clients are evaluating three things on your portfolio: skill (can you do the work?), fit (is your style right for me?), and proof (have others trusted you?). When all three align, the visitor moves to your contact page. When any of them is missing or ambiguous, they keep shopping. A polished portfolio page design is the single fastest way to demonstrate all three at once, which is why we treat it as a critical conversion asset—on par with the homepage and about page. Portfolio Page Design: Choose the Right Layout Layout is the first design decision, and it dictates how visitors experience your work. Each layout style sends a different message about your brand. Grid Layout The uniform grid is the most common choice for NYC small businesses because it feels organized and professional. Equal-sized thumbnails arranged in three or four columns help visitors compare projects quickly. It works especially well for industries where consistency matters—architecture, branding, photography, and web design. Pair the grid with card-based design principles to keep each tile scannable and tappable on mobile. Masonry Layout Masonry breaks the rigid grid by allowing tiles of varying heights, creating a Pinterest-style flow. It’s a good fit for creative industries where image aspect ratios vary—event photography, interior design, or visual art. Be cautious on mobile: masonry can collapse into a single column that feels endless, so set a sensible project cap or pagination. Filtered Grid For NYC firms that serve multiple verticals—say, a marketing agency that handles both restaurants and law firms—a filterable grid lets visitors self-segment. Categories like “Hospitality,” “Professional Services,” or “Retail” surface relevant projects in one click, lifting time-on-page and reducing the friction that leads to bounces. What Every Portfolio Project Should Include A thumbnail with no context is just a picture. To convert, each portfolio entry should open into a project detail page that answers the four questions every prospect asks: What was the problem? What did you do? What was the result? Can I trust this? The Six Elements of a Strong Case Study For each project, include: (1) a clear project title and short summary; (2) the client name, industry, and location (with written permission); (3) the challenge or problem in one to two sentences. Then continue with: (4) your approach or process described in plain language; (5) measurable outcomes—lift in inquiries, sales, traffic, or whatever metric matters; and (6) at least one direct client quote. Concrete numbers build credibility far more effectively than vague claims like “successful portfolio page design.” Tell a Story, Not Just a Spec Sheet The strongest case studies read like mini-narratives. Open with the client’s situation, escalate with the challenge, resolve with your solution, and close with the result. This structure—familiar from journalism and film—keeps visitors reading. A well-told case study also pairs naturally with testimonials and trust signals elsewhere on the site, reinforcing your credibility across the entire user journey. Photography, Mockups, and Visual Quality Your portfolio is judged on visual quality before anyone reads a single word. Sharp, well-lit, original imagery is non-negotiable. As we explored in our breakdown of stock photos vs custom photography, generic stock visuals on a portfolio page are a major credibility killer—prospects can smell them instantly. Use Real Photography Where Possible For physical projects—interior spaces, products, events, branded environments—invest in a few hours with a professional photographer once a year. The cost is modest, and the lifetime ROI of high-quality assets across your portfolio, social media, and marketing materials more than justifies it. Smart Mockups for Digital Work For web design, branding, or marketing work, device mockups (laptop, phone, tablet frames) make screenshots feel finished. Free tools and Figma plugins can produce polished mockups in minutes. Optimize Every Image Portfolio pages are image-heavy by nature, so file optimization is critical. Follow Google’s Fast Loading guidance: serve next-gen formats like WebP, lazy-load below-the-fold images, and compress to keep each file under 200 KB where possible. Every image needs descriptive alt text for both accessibility and SEO. Optimize Your Portfolio Page for Conversions A beautiful portfolio page design that doesn’t capture leads is wasted real estate. The portfolio page design should funnel visitors toward an action—a contact form, a discovery call, or a quote request. Place CTAs Strategically Include a primary call-to-action button at the top of the page (above the fold), again at the midpoint, and once more at the bottom. On individual project detail pages, end with a CTA like
Trust badges and security seals for NYC small businesses — IL WebDesign Manhattan

Trust Badges and Security Seals: Where to Place Them on Your NYC Small Business Website

For NYC small businesses, every visitor who lands on your website is asking the same silent question: Can I trust this company with my money, my data, and my time? In Manhattan, where competition for local search visibility is fierce and consumers are sophisticated buyers, the answer needs to be visible within the first few seconds. That is where trust badges and security seals come in. These small visual signals are a remarkably efficient way to telegraph credibility, safety, and professionalism — but only when they are placed correctly. In this guide, we walk through exactly where to position trust badges on your NYC small business website to convert more visitors, which seals to use, and which to skip entirely. Why Trust Signals Matter for NYC Small Businesses Research by the Nielsen Norman Group consistently shows that perceived trustworthiness is one of the strongest predictors of whether a visitor will complete a form, place an order, or even read past the hero section. New York City consumers, in particular, have been trained by years of e-commerce to scan a page for familiar logos — Visa, Norton, Better Business Bureau, Google reviews — and they make a snap judgment within milliseconds. For a small business in Manhattan, Brooklyn, or Queens, the stakes are even higher. You may not have the brand recognition of a national chain, so visual signals do the heavy lifting. A well-placed trust badge says, “Other people use this service, my data is encrypted, and a credible third party has verified this business.” Without those signals, even a beautifully designed page can feel risky. The conversion psychology behind badges Behavioral research shows three forces driving the impact of trust badges: social proof (others have used and approved this), authority transfer (a recognized third party vouches for you), and risk reduction (your data, payment, and identity are protected). A well-designed homepage like the one we cover in our guide to homepage design for NYC small businesses weaves these cues into the layout naturally rather than pasting badges as an afterthought. The Core Categories of Trust Badges and Security Seals Not all badges are created equal. Before you decide where to place them, you need to understand the four main categories and the role each plays on a small business website. 1. Security and SSL seals These are the badges most directly tied to data protection: SSL certificate seals (DigiCert, Sectigo, Let’s Encrypt), site scan badges (Norton, McAfee SECURE), and PCI compliance marks. They reassure visitors that the connection is encrypted and that the site is monitored for malware. To understand why HTTPS is the foundation here, see our deep dive on HTTPS and SSL for SEO. 2. Payment provider badges Visa, Mastercard, American Express, PayPal, Apple Pay, Stripe, and Google Pay logos all signal that recognized financial institutions stand behind your transactions. For NYC service businesses that accept deposits or e-commerce sites, these are non-negotiable near the checkout. 3. Third-party authority badges These transfer the credibility of a respected organization onto your brand. Examples include the Better Business Bureau (BBB) logo, Google Business Profile verification, Yelp “People love us on Yelp” badges, industry association memberships, and Manhattan Chamber of Commerce affiliations. Reviewing how your Google profile fits into local search visibility is covered in our Google Business Profile optimization guide. 4. Social proof and review badges These include star ratings from Google, Trustpilot widgets, Yelp ratings, and “Featured in” media logos (New York Times, Time Out NY, NY1). They lean less on technical security and more on the wisdom-of-the-crowd effect. Where to Place Trust Badges Above the Fold The first viewport — what users see before they scroll — does the most work for your conversion rate. Yet most NYC small business websites either crowd it with five competing badges or leave it empty entirely. The right approach sits between those extremes. Header bar: one or two strong signals The very top of the page — beside your phone number or in a slim top bar — is ideal for one or two compact badges. A “BBB A+ Accredited” mark or a “Manhattan Chamber of Commerce Member” badge works well here. Resist the urge to put four or five badges in the header. Crowding the top bar fights with your logo and your primary call-to-action, which should remain the visual anchor. Hero section: a star rating, not a wall of logos In the hero, the highest-converting placement is a single line of social proof: “★★★★★ Rated 4.9 by 320+ Manhattan clients” with the Google logo beside it. This kind of badge integrates with your headline rather than competing with it. Visual hierarchy is what makes this work, and our post on visual hierarchy in web design explains why grouping a single number with a star rating outperforms five scattered logos. Just below the fold: the “as featured in” strip Once a visitor scrolls past the hero, a grayscale strip of media or partner logos is the next-best place for trust signals. Keep them small, evenly spaced, and ideally clickable to a press page. This is the strip where Time Out NY, NY1, or industry partner logos shine without overwhelming the page. Trust Badges on Checkout, Forms, and Conversion Pages If above-the-fold is about building general credibility, conversion pages are about reducing last-second anxiety. This is where trust badges earn their highest ROI. Beside the submit button The single highest-leverage placement on your site is directly next to the submit or “Place Order” button. Industry split tests from Think with Google have shown that a small lock icon plus a one-line reassurance (“Your information is encrypted and never shared”) can lift form completion meaningfully. Pair this with a familiar SSL seal for ecommerce or payment-related forms. In the form footer For service businesses collecting contact information, the form footer is the right place for a “We respect your privacy” message accompanied by a small padlock icon. This subtle signal calms a nervous visitor without screaming “DANGER” — the visual
Live chat widget design for NYC small businesses — IL WebDesign Manhattan

Live Chat Widget Design: 7 Best Practices for NYC Small Businesses to Convert More Leads

Table of Contents Why Live Chat Matters for NYC Small Businesses Where to Place Your Live Chat Widget Visual Design of the Chat Button Crafting an Effective Welcome Message Mobile-Friendly Chat Widget Design Hours of Operation and Offline Behavior Performance and Page Speed Impact Common Live Chat Widget Mistakes How to Measure Chat Widget Performance Key Takeaways For NYC small businesses, the difference between a visitor who leaves silently and a lead who becomes a paying customer often comes down to one thing: real‑time conversation. A well‑designed live chat widget gives your Manhattan, Brooklyn, or Queens website a human voice exactly when potential customers have questions, hesitations, or buying intent. According to Think with Google, response speed has become one of the strongest predictors of conversion for service-based small businesses. But a chat widget that is poorly placed, badly styled, or aggressively scripted does the opposite — it annoys visitors and erodes trust. This guide breaks down the live chat widget design decisions that NYC small businesses need to make to turn casual browsers into qualified leads. Why Live Chat Matters for NYC Small Businesses NYC is one of the fastest, most impatient markets in the world. A prospective customer in Midtown looking for a website designer, accountant, or contractor will spend seconds — not minutes — deciding whether to reach out. Email forms create friction. Phone calls feel like a commitment. Live chat fills the gap with a low‑barrier, instant channel that matches how New Yorkers actually behave: quick, mobile, and on‑the‑go. Research from the Nielsen Norman Group shows that users prefer chat for short, transactional questions like pricing, availability, and scope. For a small business, this is gold — most NYC service leads start with one of those three questions. A live chat widget that surfaces answers in seconds shortens your sales cycle and reduces dependence on phone tag. Beyond conversions, live chat also gives you a continuous research stream. Every question a visitor types is a signal about what is missing from your site copy, your FAQ page, or your pricing page. The chat transcripts become a living document of customer intent — far more honest than any survey. Where to Place Your Live Chat Widget Chat widget placement is the single biggest visual decision you will make. Get it wrong and the widget either gets ignored or actively damages your conversion rate. The web design convention — and what users now expect — is the bottom‑right corner of the viewport, anchored as a floating button. Bottom-Right Is the Default for Good Reason The bottom‑right corner sits in the natural F‑pattern resting zone for desktop users and the thumb‑reach zone for right‑handed mobile users. Visitors expect to find chat there because every major platform — from e‑commerce giants to SaaS dashboards — has trained them to look there. Breaking that convention to be “different” usually means losing engagement. Avoid Blocking Critical UI Never let the chat widget cover important calls‑to‑action, navigation, or product images. Test your site on a 1366×768 laptop screen — the most common resolution among NYC office workers — and make sure the chat button does not overlap the above-the-fold primary CTA. On long content pages, consider hiding the widget until the user has scrolled past the hero section so it does not compete for attention on first load. Page-Level Targeting The chat widget should not appear on every page identically. Suppress it on the checkout or quote-submission page where you want zero distractions. Boost its prominence on pricing pages, service pages, and the contact page where buyer intent is highest. Visual Design of the Chat Button The chat button itself is a miniature brand element. Treat it with the same care you would give a hero CTA. Three rules matter most: contrast, size, and brand alignment. Contrast and Color Use a color that contrasts sharply with the page background but still belongs to your brand palette. If your primary brand color is blue and your CTA color is orange, the chat button should usually take the CTA color so it reads as “action” to the visitor. Avoid using pure red unless you want urgency cues — for most service businesses, the calm‑but‑visible accent works better. Size and Icon A 56–64px circle is the sweet spot on desktop. Smaller looks unimportant, larger feels intrusive. Use a simple chat‑bubble icon, not text. Icons are universally understood and survive translation, while a “Chat with us” label can blow up on Spanish‑speaking visitors who make up a meaningful share of NYC traffic. Animation and Attention Cues A subtle pulse animation every 8–15 seconds increases the click rate. Avoid constant motion — it reads as desperate and slows the page. A single bounce when an inactive visitor has been on the page for 30 seconds is a good middle ground. Test it; what works for a Brooklyn restaurant will not always work for a Manhattan B2B agency. Crafting an Effective Welcome Message The first message a visitor sees in your chat widget will make or break engagement. Default generic messages like “Hi! How can I help?” perform poorly because they put the burden on the visitor to know what to ask. Be Specific and Contextual Replace the generic greeting with a context‑aware question tied to the page. On a pricing page, surface: “Have a quick question about our pricing tiers?” On a service page: “Want a 5‑minute walkthrough of how this works for NYC businesses?” Specificity dramatically improves response rate because it shows the visitor what kind of help they can actually get. Set Expectations Honestly If a real human staffs your chat from 9 AM to 6 PM EST, say so. “Replies typically in under 2 minutes during business hours” beats vague promises every time. Honest expectations reduce abandonment when visitors do not see an instant reply. Use the Visitor’s Behavior Trigger the welcome based on intent signals — time on page, scroll depth, or a return visit. A visitor who has scrolled 80% of the
search bar design best practices for NYC small businesses — IL WebDesign Manhattan

Search Bar Design: 7 Best Practices for NYC Small Business Websites

Irwin Litvak | May 11, 2026 | 10 min read WEBSITE DESIGN Table of Contents Why Search Bar Design Matters for NYC Small Businesses Make the Search Bar Visible and Easy to Find Use Clear Placeholder Text That Guides Users Add Auto-Suggestions and Autocomplete Design for Mobile Users First Handle Zero Results With Care Include Search Filters and Sorting Track Search Analytics to Improve UX Common Search Bar Design Mistakes to Avoid Key Takeaways For NYC small businesses, every second a visitor spends looking for information on your website is a second closer to losing them to a competitor. Strong search bar design is one of the most overlooked but high-impact elements on a business website. When a Manhattan customer lands on your site looking for a specific product, service, or piece of information, the search bar becomes their fastest path to conversion. A well-designed search bar can dramatically reduce bounce rates, increase pages per session, and ultimately drive more inquiries to your contact form. In this guide, we’ll walk through seven proven search bar design best practices specifically tailored to the needs of NYC small businesses serving busy Manhattan, Brooklyn, and Queens customers. Why Search Bar Design Matters for NYC Small Businesses NYC consumers expect speed and efficiency in everything they do, and your website is no exception. According to research from the Nielsen Norman Group, users who use search are typically more goal-oriented and convert at higher rates than those who browse. For a NYC small business, that means visitors who find your search bar quickly are far more likely to fill out a contact form, request a quote, or pick up the phone. Poor search bar design has real costs. Visitors who can’t find what they need within a few seconds often leave the site entirely. They might assume your business doesn’t offer what they want, even if the information is there. That’s lost revenue, wasted ad spend, and damage to your local reputation. For service businesses competing in Manhattan’s saturated market, every visitor counts. The good news is that great search bar design isn’t expensive or technically complex. It’s a matter of understanding user behavior, applying proven design principles, and testing the experience on real devices. Let’s get into the seven practices that matter most. 1. Make the Search Bar Visible and Easy to Find The first rule of search bar design is that users must be able to find it without thinking. On a NYC small business website, the search bar belongs in a predictable location, usually the top right of the header or near the main navigation. When users land on your site, their eyes will scan for it instinctively. If they can’t locate it within a couple of seconds, they’ll either guess your menu structure or hit the back button. Use an Open Input Field, Not Just an Icon One of the most common design mistakes is hiding the search bar behind a magnifying glass icon that users must click to expand. While this saves header space, it adds a click and breaks the user’s flow. Research has consistently shown that an open input field gets used far more often than a collapsed icon. For NYC businesses with content-heavy websites, an always-visible search field is the better choice. Size and Contrast Matter The search bar should be large enough to type into comfortably and have enough contrast with the surrounding background to stand out. Aim for at least 27 characters of visible space inside the input field. This length comfortably accommodates most search queries and signals to users that long, descriptive searches are welcome. 2. Use Clear Placeholder Text That Guides Users Placeholder text inside your search bar isn’t just decoration. It’s a chance to teach users what they can search for and reduce confusion. A generic “Search” placeholder is a missed opportunity. Instead, give users a hint that nudges them toward the kinds of queries your site can answer. For a NYC plumbing company, a placeholder like “Search services, locations, or FAQs” gives visitors confidence that the search will work for their use case. For an e-commerce store, “Search 1,200+ products” signals scale and invites exploration. Tailor the placeholder text to your business model and the real questions your customers ask. Keep Placeholder Text Short While guidance is useful, placeholder text shouldn’t be so long that it gets truncated on mobile screens. Stick to five or six words maximum, and make sure the text remains legible on all device widths. Once a user clicks into the field and starts typing, the placeholder disappears, so the goal is to set expectations quickly, not to provide instructions. 3. Add Auto-Suggestions and Autocomplete Autocomplete is one of the single most impactful upgrades you can make to your search bar design. As users type, suggestions appear in a dropdown beneath the input field, allowing them to jump directly to a result without finishing the query. This dramatically speeds up navigation and reduces typos, especially on mobile devices where typing is slower and less accurate. For NYC small businesses, autocomplete should pull from your most common search queries, your service pages, your product names, and your blog content. If you have a strong internal linking strategy, autocomplete becomes even more valuable because users can navigate deep into your site in a single interaction. Highlight Matched Terms When suggestions appear, bold the characters the user has typed so they can scan results quickly. This is a small detail with a big impact on perceived usability. It tells the user, “yes, the system understands what you’re typing,” and builds trust in the tool. Limit Suggestions to 5–8 Items Too many suggestions overwhelm users and slow decision-making. Five to eight suggestions is the sweet spot, with the most popular or relevant results at the top. If your site has a lot of content, consider grouping suggestions by category, such as “Services,” “Blog Posts,” and “FAQs.” 4. Design for Mobile Users First The majority of NYC small business website visits

IL Webdesign is a dynamic digital agency specializing in creating bespoke websites, strategic SEO, and impactful social media marketing to propel businesses forward in the digital landscape.

Contact Us